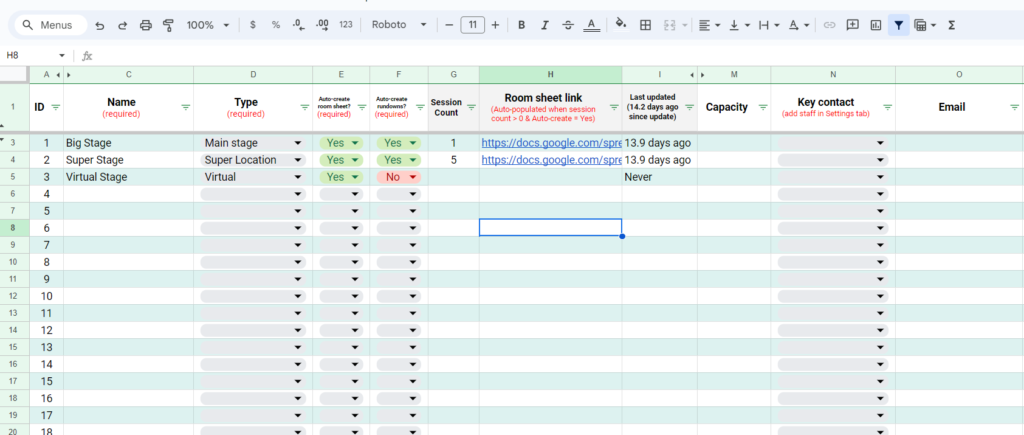
Most events have a schedule with sessions happening concurrently, either in different rooms, or on separate video tracks (for virtual events).
You will need to list all your event’s locations or rooms in the Locations tab of the Management Sheet. In turn, this will make these locations available throughout your project, including in the Project Sheet and in the Management Sheet.
For each location, you can also specify the room type, and a number of additional optional fields such as the room capacity, physical address, and so on.
Pay attention to Colum E and F – this is where you can decide to create the Room Sheet & Rundown automatically, or not, for each of your locations. You should select “Yes” for most of your event’s rooms, unless there is nothing happening in that room that requires a rundown.
Overview
Through these modules, we will show you how easy it is to produce an event using ProjectSheet.io as your main project management tool.
After reading this documentation, you will have a good understanding of how the sheets work, where to input information, where to see and check information, and what tools are available to you before and during the event.
ProjectSheet.io is a tool suite that makes the production of your event easy and secure.
But how does it actually work? What are the different components? Functionally, ProjectSheet.io has four components – The Management Sheet to define your project settings before you start – The Project Sheet to manage your event during the project phase – The Room Sheets to support your event during production days – The Dashboard to give you statistics throughout the event
Your shared Project Folder
Your Projectsheet.io tool suite includes a shared project folder.
This folder is shared with you at the beginning of the project.
In this shared folder, you will find
Your Management Sheet
Your Project Sheet
Your Room Sheets
Several subfolders, with an name telling you what goes in it
Note: To ensure your project runs smoothly, make sure to use the correct subfolder for each of your files.
You will find a document in each subfolder explaining what they are used for.
Before you start – setting parameters
The Management sheet is mostly used before you start using the Project Sheet.
It is where you set project parameters. This includes
The name and details of your event’s rooms or video tracks
The names of your staff
And more!
We recommend doing this setup at the beginning of the project.
However, you can also use the Management Sheet throughout the project, if you need to update parameters.
During the project – providing information
The Project Sheet is the centerpiece and is used throughout the whole event preparation phase.
This is where you input all your event information, including
The list of speakers, with their contact details, personal information, onboarding type,etc
The list of sessions, with their date, time, and room / video track, and the name of the speakers
The list of sponsors (if applicable), and the association of sponsors with sessions
The Project Sheet includes extensive automation, built-in reporting and helper tools.
During the event – using the information
Finally, the RoomSheets are used during the event itself.
They provide a detailed and organized view of the schedule for each Room / Video track, for each day.
They are used by your production team to know exactly what will happen, when it will happen, and who is involved.
The Dashboard – An overview of your project
In the Dashboard, you will access statistics about your event.
For example, you will know what percentage of your content has been produced, or how many of your speakers have missed their scheduled appointments.
Importance of accurate and spell-checked information
It is critical that any information added to your project’s spreadsheet is accurate and without spelling errors.
Your AV production team will be referencing the information on your spreadsheet.
So if, for example, a speaker or session name is incorrect, it will be displayed the same way on the live broadcast or in pre-recorded edits.
Note: It is the responsibility of the event organizer to ensure all information is precise and up-to-date.
We recommend that at least two members of the organizing team take the time to proof-read and validate all the information provided.
This is a great way to avoid having to deal with mistakes right before an event, which could result in additional fees.
Who do I contact for questions?
For any questions on how to use the spreadsheet, please contact your ProjectSheet.io project manager.
For production-related matters, get in touch with your AV production team.
Note: This contact information would have been provided to you during the project kick-off call.
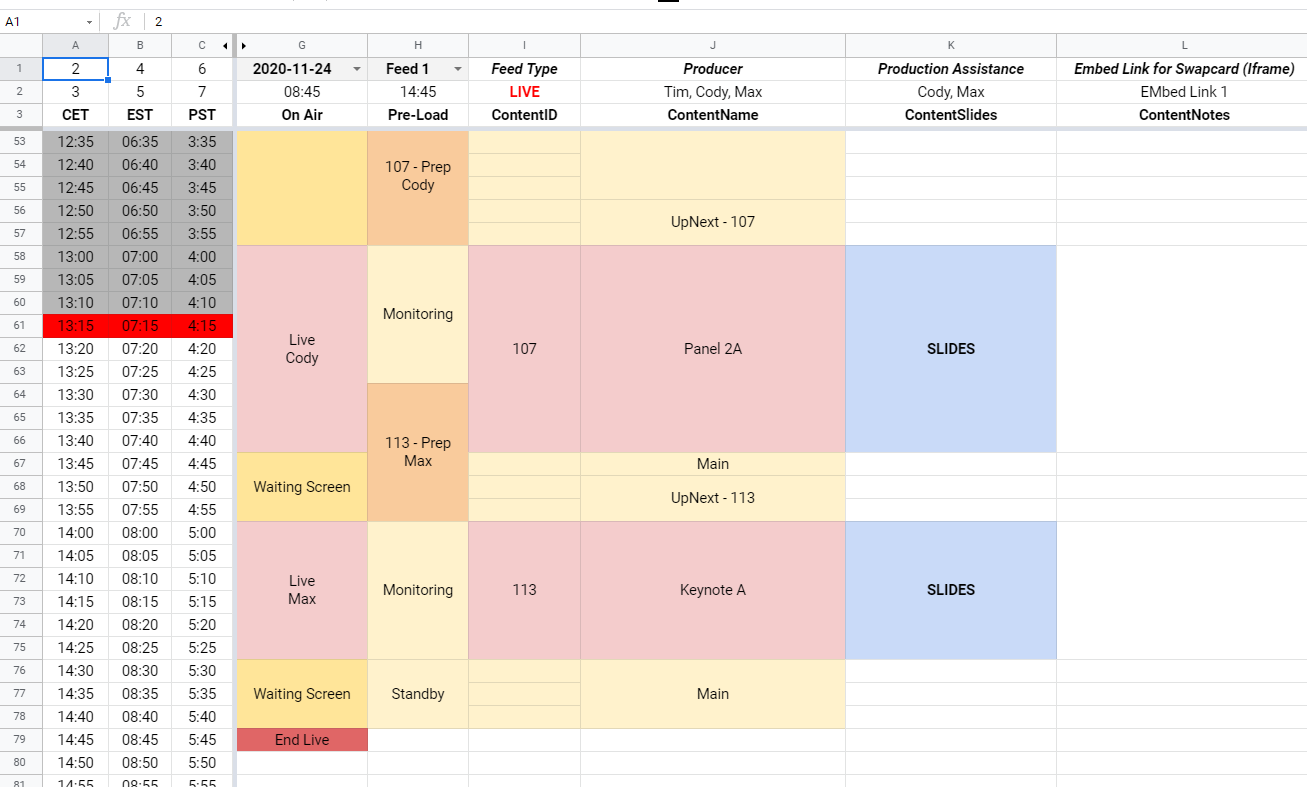
Rundown Tab
The Rundown tab is where you can see what is being displayed on the stream at any given time. This tab may take a few minutes to refresh, as it is presenting information in real-time.
Each Room Sheet is dedicated to one single location, and contains one Rundown tab per event day for this room.
Your production team uses the Rundown tab as their main source of information during the production of the event.
It provides a synthetic view of all sessions, in chronological order, and includes the list of speakers as well as production notes.
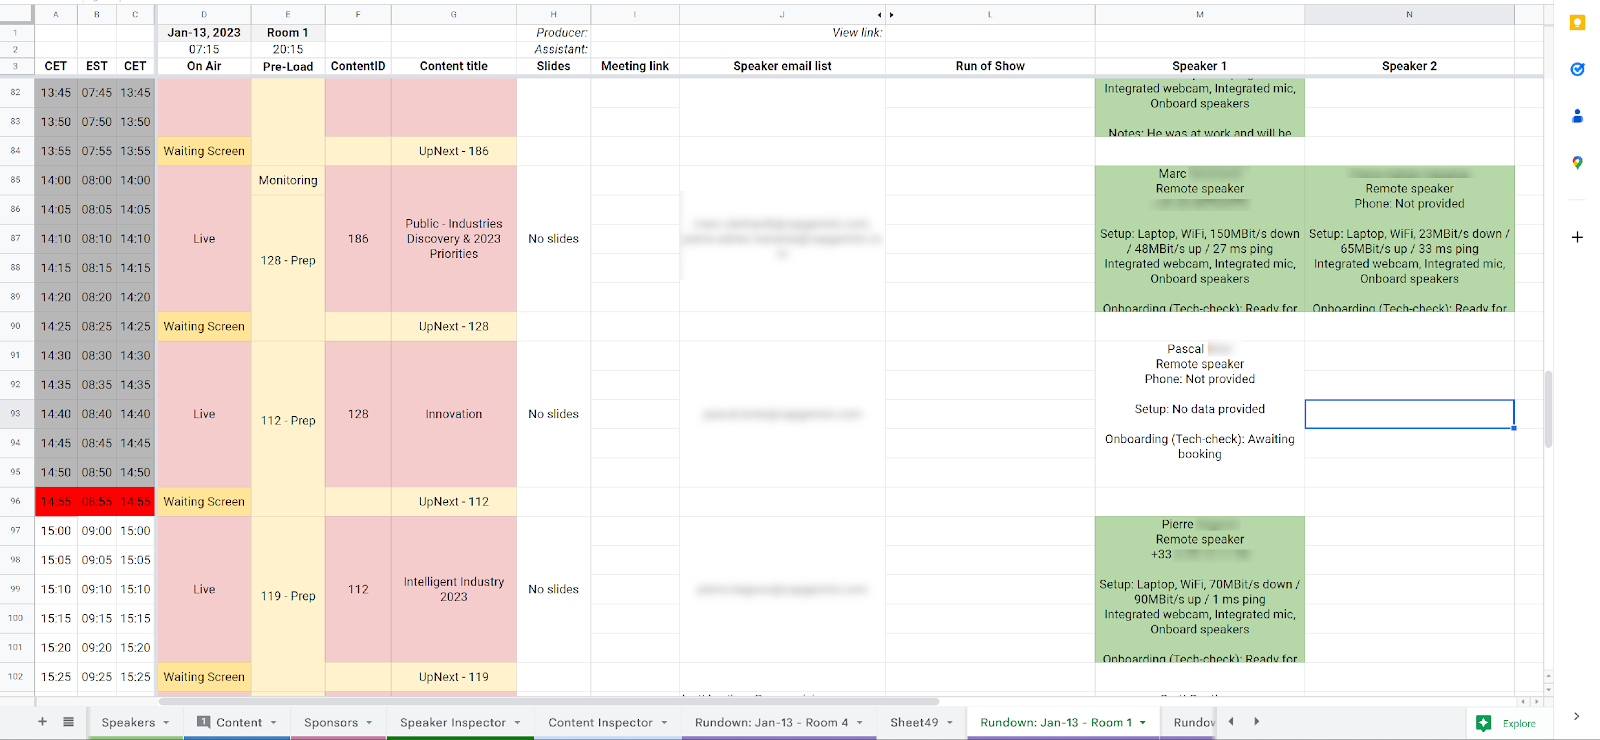
During a session, the time is tracked in 5-min increments. The current time will always be highlighted in red. The time passed will be grayed out (as depicted in the image below).
What is included in ProjectSheet.io?
ProjectSheet.io is a tool suite that makes the production of your event easy and secure.
But how does it actually work? What are the different components? Functionally, ProjectSheet.io has four components – The Management Sheet to define your project settings before you start – The Project Sheet to manage your event during the project phase – The Room Sheets to support your event during production days – The Dashboard to give you statistics throughout the event
Your shared Project Folder
Your Projectsheet.io tool suite includes a shared project folder.
This folder is shared with you at the beginning of the project.
In this shared folder, you will find
Your Management Sheet
Your Project Sheet
Your Room Sheets
Several subfolders, with an name telling you what goes in it
Note: To ensure your project runs smoothly, make sure to use the correct subfolder for each of your files.
You will find a document in each subfolder explaining what they are used for.
Before you start – setting parameters
The Management sheet is mostly used before you start using the Project Sheet.
It is where you set project parameters. This includes
The name and details of your event’s rooms or video tracks
The names of your staff
And more!
We recommend doing this setup at the beginning of the project.
However, you can also use the Management Sheet throughout the project, if you need to update parameters.
During the project – providing information
The Project Sheet is the centerpiece and is used throughout the whole event preparation phase.
This is where you input all your event information, including
The list of speakers, with their contact details, personal information, onboarding type,etc
The list of sessions, with their date, time, and room / video track, and the name of the speakers
The list of sponsors (if applicable), and the association of sponsors with sessions
The Project Sheet includes extensive automation, built-in reporting and helper tools.
During the event – using the information
Finally, the RoomSheets are used during the event itself.
They provide a detailed and organized view of the schedule for each Room / Video track, for each day.
They are used by your production team to know exactly what will happen, when it will happen, and who is involved.
The Dashboard – An overview of your project
In the Dashboard, you will access statistics about your event.
For example, you will know what percentage of your content has been produced, or how many of your speakers have missed their scheduled appointments.
Progress and Issues
The Progress and Issues tab provides an overview of all your sessions. Any data you input into the Content tab will automatically display here.
What is the difference between the Progress and Issues tab and the Schedule tab?
Both tabs provide an overview of your schedule, but they have a different use case.
The Progress and Issues tab focuses on
Providing status information on each content element (pre-recording scheduled, ready for live, etc)
Informing you of current issues that you need to solve (time conflicts, pre-recording not scheduled, speaker linking issues, etc)
Use the Progress and Issues tab to get an overview of the progress of the production of your content, and use the information to take appropriate action.
Note: After you correct issues, the Progress and Issues tab will update, but this can take up to 15 minutes.
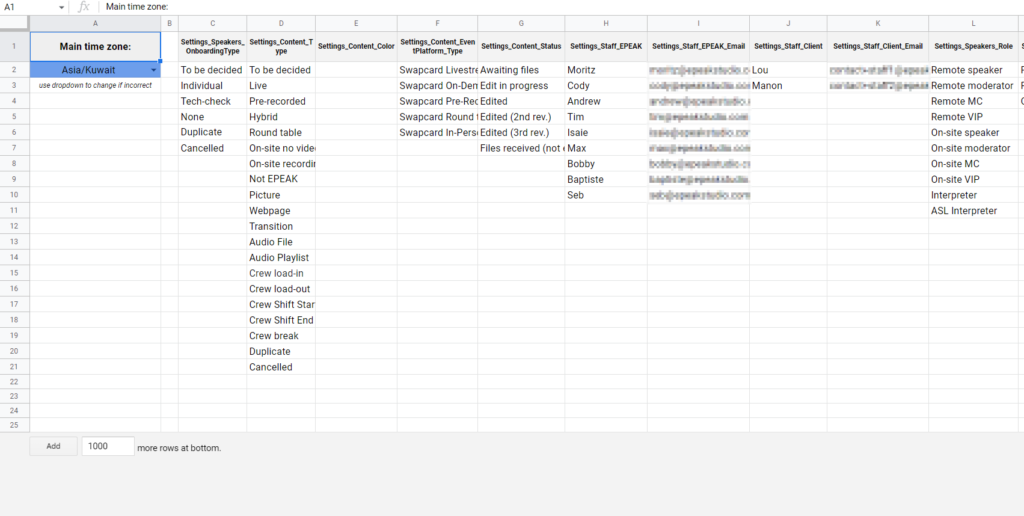
Settings Tab
This tab is where you can set various project parameters, to customize your Project Sheet to your needs.
These parameters include
Event Time zone
Speaker onboarding type
Content types available
Name and email of your staff
List of different speaker roles
And more!
Note: The Settings tab contains default values covering a wide array of common project needs.
Feel free to update it or not, based on the specifics of your project. The only value you need to leave in the list is “Cancelled” where it exists.
Importance of accurate and spell-checked information
It is critical that any information added to your project’s spreadsheet is accurate and without spelling errors.
Your AV production team will be referencing the information on your spreadsheet.
So if, for example, a speaker or session name is incorrect, it will be displayed the same way on the live broadcast or in pre-recorded edits.
Note: It is the responsibility of the event organizer to ensure all information is precise and up-to-date.
We recommend that at least two members of the organizing team take the time to proof-read and validate all the information provided.
This is a great way to avoid having to deal with mistakes right before an event, which could result in additional fees.
Step 1: Review and complete the Settings tab
Head over to the Settings tab. This is where you can control what is available for several fields in the Project Sheet, such as
Speaker onboarding type (1-to-1, Tech check, No onboarding, etc)
The Management Sheet is pre-filled with default values, catering to most event needs.
You can add or remove values as you see fit. Note: always leave the “Canceled” option for both Speakers onboarding type and Content type.
Step 1: Add Speakers
In the Speakers tab, fill out each speaker’s first name, last name and email address.
Top tip: If in doubt, pay attention to each column’s header – it gives you useful information on how to fill it
Onboarding
Next, select their Onboarding Type and Role.
The Onboarding Type refers to the way in which a remote speaker (connecting via a conference call software) will be prepared before an event.
For example, they could be scheduled for a Tech-Check (a 15min technical brief) or 1:1 Onboarding (a 45min call combining a technical check and general briefing).
Role
The Role column is used to specify what this person will do during the event. For example, they could be a Remote speaker, an Onsite speaker, a VIP, an MC, a moderator, and so on.
Remember: If you want to add or remove roles from the list, simply head over to the Management sheet to do that.
Under Managed by, insert the person on your team in charge of that particular speaker by selecting their name from the dropdown menu.
If your staff member’s name is missing, head over to the Management Sheet and add them.
Speaker information
Finally, fill out the fields labeled: Email, Job Title, Company and Phone Number.
Important: Please never swap content between IDs or delete any rows. The order in which speakers are listed in this tab is irrelevant to your event’s schedule, and must remain the same throughout the project. Swapping a person from one Speaker ID to another will create data integrity issues and lead to unwanted behavior.
How to use the Room Sheets
The data you entered in the Management Sheet and in the Project Sheet is combined together in the Room Sheets. They are generated automatically and provide you with a synthetic view.
There is one Room Sheet per Location, containing a Rundown tab for each day of the event.
The Rundown allows you to follow what is happening in each room with ease, and keeps track of the time.
Top Tip: Your production team will use the Rundown tab in the Room Sheet as a reference during the production. You should use it too!
Each Rundown tab keeps track of the current time, marked with the red set of lines in Columns A, B and C. Thanks to this feature, you can easily identify the next session.
The Rundown gives you easy access to a session’s information at a glance during production.
Who are the speakers (name, contact details including phone number)
Is anyone joining the session remotely
What is the duration of the session
Is there anything specific about this session’s format
To conclude, the Rundown tab is perfect for simple sessions. If your session is more complex, read the next chapter and learn how to build a Cue Sheet for your session.
Reference Guide
The Project Sheet is made of a number of tabs. Within each of the tabs, is a spreadsheet with various columns.
Here we will explore these columns – the type of data that goes into each, who is responsible for adding the information, how to update the data, what to do once the data is updated, how to re-link mapped cells when necessary, as well as other important things to note.
Progress and Issues / Schedule Tabs
Both tabs are automatically generated and read-only. You cannot modify their content – changes won’t be saved.
On both tabs you can see:
Time zone (top left): Displays the time zone of the event and all its sessions.
Note: For the progress and issues tab, we have an arbitrary 5-min break between live sessions that is suggested.
This is to allow the production team to prepare for the next one and the attendees to move to the next room.
Note: In the reality of an event, especially for breakouts, back to back sessions cannot physically happen. They will start late.
If the time gap is less than 5-mins between the two sessions, it will be flagged in purple. It is up to you to take action on your schedule or not.
The schedule provides the following details:
Start and End time
Content ID
Content Type (i.e. Live, Pre-recorded, VOD, etc.)
Content Duration
Content Title
Time Warning (in case of back-to-back live sessions)
Collision Warning (conflict with other sessions)
Warning (indicates a speaker is unlinked from the Content tab)
Content Tab
Content ID: Every session is assigned a unique ID and can only be listed once. An ID cannot be reassigned if the session gets cancelled. If this happens, set the session’s Content Type to Cancelled.
Content Title: Make sure the session title is capitalized and spelled correctly, as it will be displayed as is on the UpNext screen.
Content Type: Select an option via its dropdown menu.
To be decided: No choice has been made as to whether the content will be live or pre-recorded.
On-site Livestream: Content takes place at a venue and is live streamed to a remote audience.
Remote Livestream. Content takes place virtually and is live streamed to a remote audience.
Pre-recorded: Recorded ahead of time, but broadcasted to look as if it is live (i.e. simu-live or as part of content to playback during another session – used Embed location if that is the case).
Not EPEAK: Refers to any external content being used.
Round table: Content is a breakout room (on site or remote) taking place in a room, usually no camera, no recording.
Hybrid: A content that is live streamed from a venue but involves both on-site and remote speakers.
Translation: A session being translated into other languages.
On-site recording: For recordings of content during the event, for example, a VIP interview.
Duplicate: This is when there was a mistake and a content has been added twice. Label as Duplicate the ones you’d like to remove.
Canceled: Anything that has been canceled. Items should always be canceled, as opposed to deleted.
Date: Session date. Double-click in order to set.
Start time: The session’s starting time in 24-hour format (i.e. 17:30). No other format can be used.
Duration: Type in the content length, in minutes. For example, if your session is 1h30, type in “90”.
Location: Select which Room / Video feed the session will be played on (i.e. Feed 1,2,3)
Note: VOD is used for Video-On-Demand at any point in time. It should be used for content that will be made available to watch anytime by the attendees, as opposed to being live streamed into a video track at a set date and time.
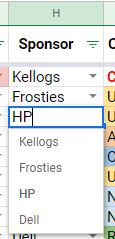
Sponsor: Select via the dropdown menu. The menu will display the information you added into the Sponsors Tab.
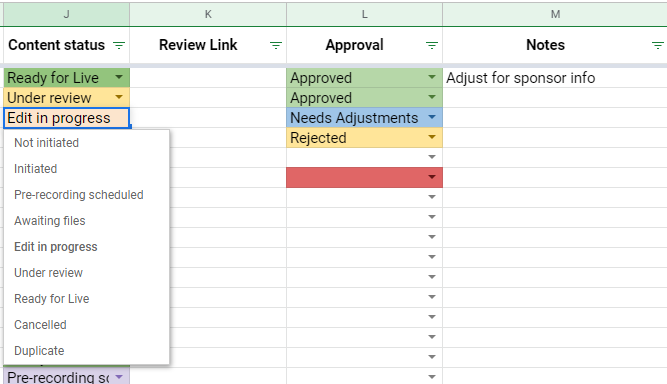
Content status: This is automated.
Review link: This link is for your internal use only, so that you can approve a pre-recording or request updates. It should not be shared with the speakers.
Approval: This is where you can approve a video edit or request updates. Select whichever applies from the drop-down menu.
Approved
Needs adjustments – if a change needs to be made on this content, please type the specifics into the Notes column.
Rejected – if you do not approve of the content the speaker has submitted.
Content language: Only needs to be filled out if the session will be interpreted into different languages.
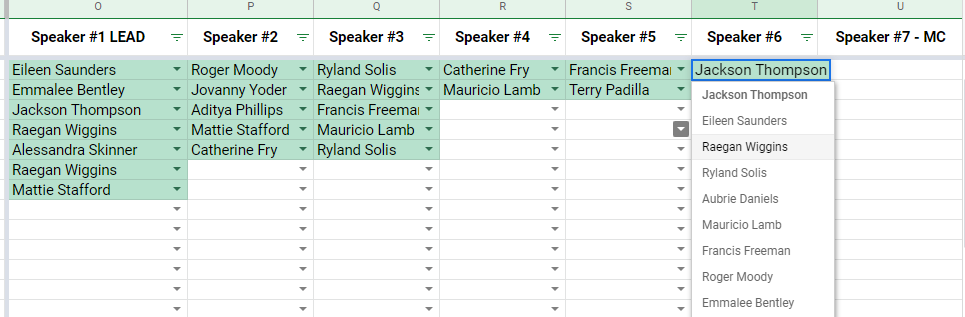
Speaker 1-7: Select the speakers for each session using the drop-down menu. Remember, the list of available speakers is pulled from the Speakers tab.
Note: If you need to adjust a speaker’s name go back to the Speakers tab and edit the First Name or Last Name column by double-clicking on it. Then, go back to the Content tab and re-select the revised name from the drop-down menu. The edit you made in the Speakers tab will not automatically show up in the Content tab.
If the speaker you selected is displayed in red, it means that there is a typo in their name – make sure to double check the spelling against what is entered in the Speakers tab.
Speaker Emails: For each session, we generate a list of email addresses belonging to the participating speakers. This allows you to copy & paste their contact simultaneously and quickly get a message out to everyone.
Speakers
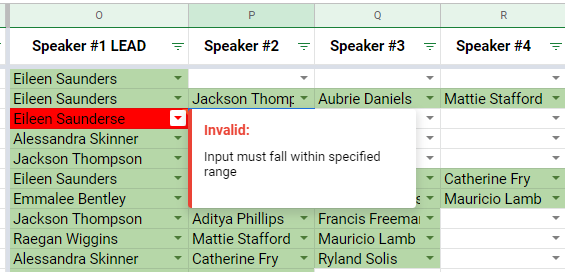
Speaker ID: Every speaker is assigned their own ID and can only be listed once. If a speaker drops out, their ID cannot be reassigned to someone else.
If a speaker’s name is blue, they have yet to be linked to a session (do this in the Content tab).
If a speaker is no longer participating, set their Onboarding Type to cancelled.
First & Last Name: Please ensure the name is spelled and capitalized correctly in each of the columns.
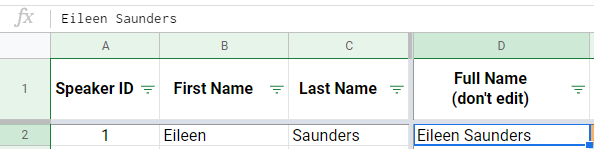
Full name: It is automatically generated from First name and Last Name columns. You can copy the name from this column to paste it somewhere, but please do not edit it here. To edit a name, please do so in the First name and Last Name columns.
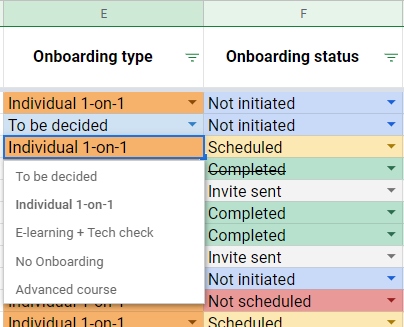
Onboarding Type: Fill out this column by using its dropdown menu.
Individual 1-by-1 – speakers that will be onboarded individually.
E-learning + Tech-check – speakers that will be enrolled in E-Learning and have a short, 15-min tech check
To be decided
Individual – Speakers that will benefit from a longer, 45-min in-depth onboarding
No Onboarding – speakers that do not require onboarding, for example onsite speakers.
Note: If a speaker is pre-recording their session, their tech-check will be performed at the start of the recording appointment.
Onboarding Status: This is an automated column that informs you of the status of the onboarding.
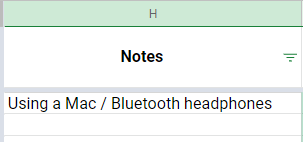
Notes: This field is used either by you, to provide specific information about a particular speaker, or by the onboarding team, to provide specific feedback about a speaker.
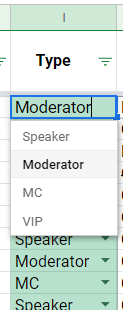
Type: For each participant, use the dropdown menu to select the type of speaker they are. Anyone selected as a Moderator, will be given additional guidance from our team during the onboarding session.
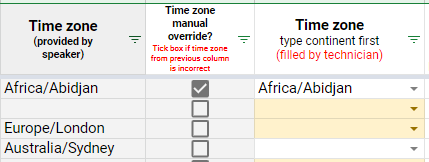
Timezone: Time zone (provided by speaker) is populated with data from the speaker booking. If incorrect, the override checkbox needs to be ticked and the correct time zone needs to be selected in the next column. It serves as context information in case they need to call the speaker.
Note: The production team will only contact speakers if they are late logging in for their live session.
Phone number: Filled automatically from the booking, if provided by the speaker. Tick the override checkbox and fill the adjacent column if there are adjustments to the provided info.
Job title & Company: Automatically filled from the booking.These can be edited by simply clicking on the cell and typing in the correction. Please ensure no spelling mistakes are made and that the capitalization of names is uniform, because this is how it will be displayed on the live
If a cell in either column is highlighted in red, the information is too long and needs to be shortened.
During a live broadcast, titles that are too long will not be cropped, but automatically shrink to fit. So, if the title is kept lengthy, the text will be small and harder to read.
Slides: If you know the speaker will be using slides, select yes off the drop-down menu. During the speaker’s onboarding or tech-check we will ensure they are familiar and comfortable with the process of how to maneuver their slides when presenting live or remotely (whichever is applicable)
Camera Check, Sound Check, Position Check: These fields will be filled out by a member of the technical team during onboarding or tech-checks. There will be three ratings given (PASS, Not great and FAIL) to denote the quality of each speaker’s remote set-up (if applicable)
Managed by (AV Provider): Here you will find the name of the AV Team representative in charge of that speaker’s tech check.
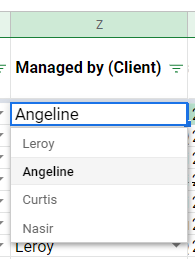
Managed by (Client): Here you can use the drop-down menu to select which of your staff members is in charge of that speaker. This information is good to have in case a presenter has a question that the AV provider team can’t answer. If no name is entered here, the main organizer’s contact will be given to the speaker.
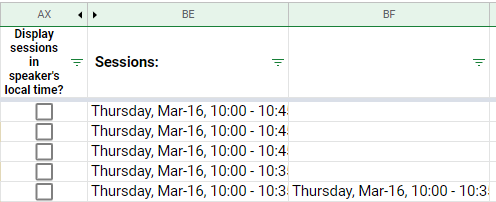
SessionsThese columns are filled out automatically through the Content tab. They cannot be edited. Each speaker will have these columns filled out with the date, time and name of their session(s). You can tick the checkbox to display the session information in the speaker’s local time.
Cancelled speakers
If a speaker drops out before the start of the event or their session gets cancelled, do not remove their row. Instead, set the speaker’s Onboarding Type to cancelled. Doing this will automatically strike through their row.
Sponsors
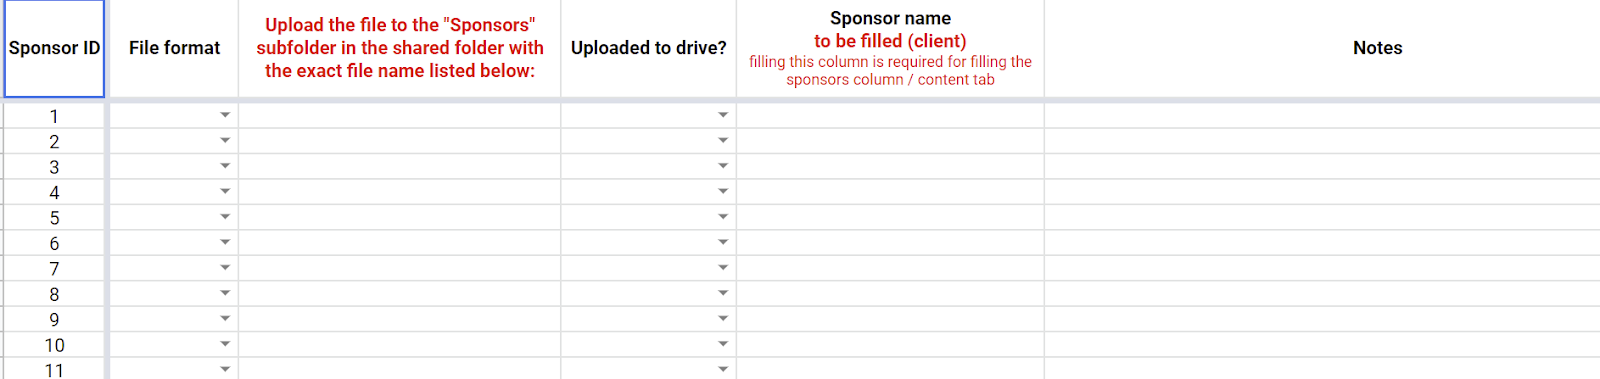
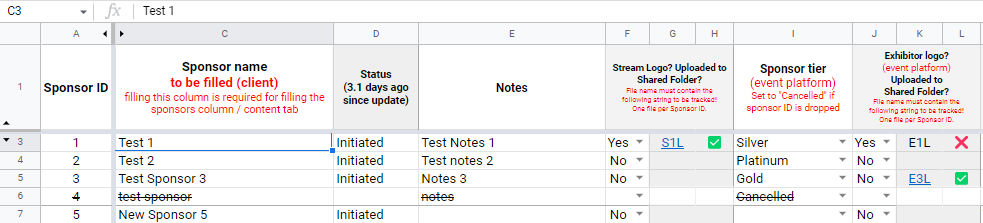
In the corresponding cells, insert the name of your sponsor and add any notes. Upload the branded material in the Sponsors folder. The Project Sheet will identify uploaded materials based on the file name matched with the sponsor name.
Schedule
The schedule provides a calendar-style view of all your sessions. Any data you enter into the Content tab will automatically be displayed here.
As items are automatically updated throughout the day, the calendar may disappear for a few seconds to refresh. It will quickly return to normal.
The Schedule tab is here to provide a calendar-style view of your schedule, with detailed planning information.
This allows you to check if the dates and times are correct, and identify any scheduling mistakes easily.
Understanding the Management Sheet
The Management Sheet allows you to set project parameters. We highly recommend setting these before you start your project.
It also provides you with an overview of your project’s stats, and allows you to correct issues during the project.
Most events have a schedule with sessions happening concurrently, either in different rooms, or on separate video tracks (for virtual events).
You will need to list all your event’s locations or rooms in the Locations tab of the Management Sheet. In turn, this will make these locations available throughout your project, including in the Project Sheet and in the Management Sheet.
For each location, you can also specify the room type, and a number of additional optional fields such as the room capacity, physical address, and so on.
Pay attention to Colum E and F – this is where you can decide to create the Room Sheet & Rundown automatically, or not, for each of your locations. You should select “Yes” for most of your event’s rooms, unless there is nothing happening in that room that requires a rundown.
Settings Tab
This tab is where you can set various project parameters, to customize your Project Sheet to your needs.
These parameters include
Event Time zone
Speaker onboarding type
Content types available
Name and email of your staff
List of different speaker roles
And more!
Note: The Settings tab contains default values covering a wide array of common project needs.
Feel free to update it or not, based on the specifics of your project. The only value you need to leave in the list is “Cancelled” where it exists.
Stats Tab
This tab is your entry point for all project administration tasks.
It displays a summary of your project’s progress, including useful statistics such as
Number of unmatched speaker bookings
Number of canceled tech checks
Number of no shows
It also includes a summary of the onboarding staff’s notes for canceled / no shows.
Unmatched Recordings Tab
This tab allows you to identify mismatched speaker onboarding or session recording bookings.
For example, a VIP speaker could have been booked by their assistant, or someone might have used an email address different from the one in the Project sheet.
This tab allows you to see these issues and correct them.
Meeting Links Tab
Once the details of a session (i.e. date, time and duration) are finalized, a “production call” can be created. In other words, your production team creates a Teams link to send to remote speakers before the event.
This meeting link will be used by the speakers to connect to the live session and is stored in the Meeting links tab.
This tab is where your production team will fill in the Meetings links. As a Project Sheet user, you will find your session’s meeting link in the Project Sheet, Content tab, as well as the Rundowns for each session.
Log tabs
The Management Sheet contains 3 useful logs tabs
Speakers Log
Content Log
Sponsors Log
These tabs provide analytical information about changes made to the Speakers tab, Content tab, and Sponsors tab in the Project Sheet.
You can use this information to find out when something has been modified.
You can also filter the logs to only include what changed in the past X days. This is useful when the log contains a long list of changes.
Calendly Bookings tab
This tab allows you to see all the bookings we have received for your project.
This advanced feature can help you find out what happened if you need to analyse a problem.
Example: A speaker has not received their invitation. By looking at this tab, you can find out that they have entered their email address incorrectly, with a typo for example.
Manual Bookings tab
This tab is an advanced feature. It lets you match a meeting that was booked outside of the booking system with the relevant speaker or session.
Example: You have a session recording that you need to book manually for any reason. You managed to schedule the meeting, but the Project Sheet still tells you that this recording is not scheduled because it was done outside our system. In this tab, you can declare the manual booking and associate it to the correct session, resulting in more accurate project statistics.
Understanding the Project Sheet
The Project Sheet has quite a few tabs. Why so many? Let’s find out.
Each tab in the Project Sheet has a different role. Take the time to understand how to use them, and you’ll be an expert in no time.
In a nutshell, the Project Sheet is used to
List the speakers that are involved in your event
List the sessions in your schedule
Associate the speakers with the sessions
List the sponsors (if any) of your event
Associate the sponsors with your sessions
Learn more about how to use it in the next sections!
The Progress and Issues tab provides an overview of all your sessions. Any data you input into the Content tab will automatically display here.
What is the difference between the Progress and Issues tab and the Schedule tab?
Both tabs provide an overview of your schedule, but they have a different use case.
The Progress and Issues tab focuses on
Providing status information on each content element (pre-recording scheduled, ready for live, etc)
Informing you of current issues that you need to solve (time conflicts, pre-recording not scheduled, speaker linking issues, etc)
Use the Progress and Issues tab to get an overview of the progress of the production of your content, and use the information to take appropriate action.
Note: After you correct issues, the Progress and Issues tab will update, but this can take up to 15 minutes.
Schedule
The schedule provides a calendar-style view of all your sessions. Any data you enter into the Content tab will automatically be displayed here.
As items are automatically updated throughout the day, the calendar may disappear for a few seconds to refresh. It will quickly return to normal.
The Schedule tab is here to provide a calendar-style view of your schedule, with detailed planning information.
This allows you to check if the dates and times are correct, and identify any scheduling mistakes easily.
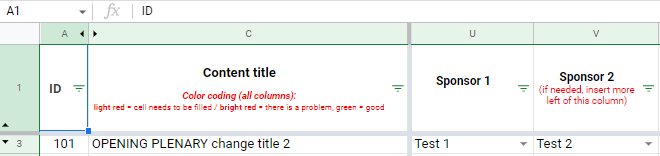
Content Tab
The Content tab contains all session-related information.
It will at least contain the list of all your sessions, and it may also include pre-recorded videos, ad-rolls and other content that needs to be cued at some point by our production team. Note: Each content item has a unique ID that cannot be changed once set.
All other elements can be edited, if needed.
If a content item needs to be removed, go to the Content Type column and select canceled off the drop-down menu .
Note: Please never delete rows, as it will cause issues. The various automated features in the project sheet require you use the Canceled status on rows that need to be removed. If you simply delete the row, it will confuse the automation and create unwanted behavior.
Speakers Tab
This is your speaker directory.
It lists all speakers with their personal details, such as their name, contact information, job title, company, and biography.
For remote speakers, this tab will also contain their onboarding results. Our team will report tech check results for each remote presenter, which includes an assessment of their internet connectivity, audio and sound setup, and level of preparation.
If a remote speaker presents a risk, this is where you will be informed of it.
Note: Each speaker has a unique ID that can’t be changed once set
If a speaker is no longer participating, please do not delete them. In their row, go to the Onboarding Type column and select Canceled off the drop-down menu.
Note: Please never delete rows, as deletion does not trigger a cancellation. If you simply delete the row, it will confuse the automation and create unwanted behavior.
Sponsors Tab
Some of your event content may be sponsored. The Sponsors tab lists all the information about your sponsors, including their logos, as well as any other items needed for the event.
Each sponsor has a unique ID that cannot be changed once set.
Production Calls tab
In this tab, you’ll find all the details your remote speakers will need to join their live sessions.
This includes the links to the video calls for each session, the list of email addresses for this call, and the time at which remote speakers need to connect.
Your production team will let you know when this is ready for you to use. The prerequisite is to have completed both the Content tab and the Speakers tab with final information.
Speakers Inspector Tab
This tab allows you to look up everything about a specific speaker more easily.
It will show information including a speaker’s contact details, session participation, scheduled tech-check and onboarding calls.
Note: This tab is read-only, it does not allow you to update speaker information (this happens in the Speakers tab)
Content Inspector Tab
This tab shows you a synthetic view of a specific session.
This is most useful when looking up information such as the speaker(s) of a session, or when and where a session is taking place.
In this tab, you can easily make some verifications, such as the level of preparation of each speaker, the presence of the slides deck, and more.
Note: This tab is read-only, it does not allow you to update content information (this happens in the Content tab)
Cue Sheet Template and other tabs
The Room Sheet includes other useful tabs for the event day
Speaker Inspector (same as the Project Sheet)
Content inspector (same as the Project Sheet)
Cue sheet – used to provide detailed information on sessions that require it.
If you want to provide detailed, minute-by-minute run-of-show instructions for a session, simply duplicate the Cue Sheet Template tab
Then, select the Content ID of your session in the drop down menu
You can then start filling the Cue Sheet and provide detailed Run Of Show instructions. Start by indicating the duration of the first segment, select the speaker that will be active, and select their position. Then, add any other information, and move on to the next segment on the line below!
Note: Pay attention to the format of the segment duration field. When entered correctly, a new line corresponding to the next segment will be created automatically with the correct starting time stamp.
In this example, the session starts at 3:30, and the first segment has a duration of 10 minutes. That’s why the next segment of the session starts at 3:40.
Once you have provided all the information about your session, repeat the process for your other sessions.
Simply duplicate the Cue Sheet template again, and go through all the steps.
Step 2: Complete the Locations tab
The Locations tab is where you define the list of rooms (for on-site and hybrid events) or video tracks (for virtual events).
Note: Remember that you can associate a type to each location. The list of values for the Location type is set in the Settings tab.
The locations you list in these tabs will be available in the Project Sheet after a few minutes.
This will allow you to specify which session happens in which room, or on which video track.
You can also provide additional information such as room capacity, main contact, street address, and so on.
Step 2: Add Content
Step 2.1: Adding the content
In the Content tab, start adding your sessions and fill out Session title, Content type, Date, Start time, Duration and Location.
Remember, if a location is missing, you can add it in the Management sheet.
Note: Please never delete any rows, or swap data between rows. Each session ID is unique and cannot be changed once set. The sessions do not have to be listed in chronological order in this tab – list them in any order.
Note: If you forgot a session in the middle of the first morning, do not shift everything – add it at the end of the list, with the correct date, start time and duration,
If you need to see your sessions displayed in chronological order, this happens in the Schedule tab. The Content tab cannot be used to see your schedule in order.
Top tip: If in doubt, pay attention to each column’s header – it gives you useful information on how to fill it
Step 2.2: Match speakers with content items
In the Content tab, you will find columns labeled Speaker #1 to #7. Under each you will find a drop down menu with the names of all the speakers. This list is based on the Speakers tab.
Fill out the columns with the names of who will be presenting in the same session.
Repeat this for all your sessions (if applicable).
Note: If you need to modify a speaker’s name, go back to the Speakers tab and change it in First and Last Name columns. You can now return to the Content tab and select the corrected name off the dropdown menu.
The Project Sheet is broken, what happened?
There are a couple rules to follow to ensure that your Project Sheet works well. Here are a few examples of what can go wrong, and how to fix it.
An automated field has been filled manually
A lot of fields are automated in the Project Sheet. This is indicated by the column header, as shown in the screenshot below.
If an automated field is accidentally filled manually, the Project Sheet will start malfunctioning.
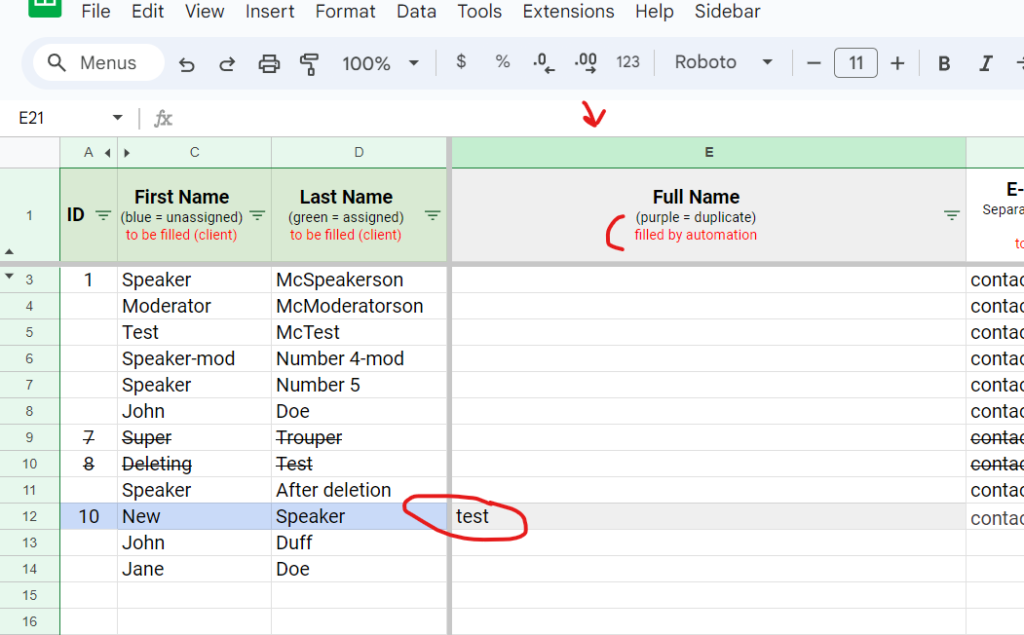
In the example below, someone filled cell E12 with some data, although column E is automated. As a result, the Project Sheet does not display data correctly anymore
In order to fix it, delete the content of Cell E12. After a few minutes, the Project Sheet will function normally again, as shown in the screenshot below.
Note: The same principle applies to all automated fields. If you notice a Project Sheet malfunction, check all automated fields and make sure nothing has been filled in manually by mistake.
I accidentally deleted a line
It is common to want to delete a line if its information is not needed anymore. However, this is not the correct method to use in the Project Sheet. Instead, the line’s status must be set to Cancelled, as shown below
So what happens if a line is deleted by mistake? In this example, Content ID 105 has been completely deleted.
In order to fix this, we will re-create a line with Content ID 105 at the bottom of the list, fill it with placeholder data, then cancel it.
This will allow the Project Sheet to update everything correctly in the backend, preventing any further issues.
How to Provide Detailed Run Of Show information
It is common to need to provide additional information about what will happen in any particular session.
With ProjectSheet.io, there are two ways to do this.
Option 1: Short sentence for each session (Notes column in the Content tab)
Option 2: Detailed instructions about your session’s content (to the second) if you use Cue Sheets
The first option will allow for a display of these instructions in the Room Sheet, in the Rundown tab.
The second option involves creating Cue Sheets, and should only be used if you need to provide detailed instructions for a session.
Option #1: Simple instructions in the Content tab (Project Sheet)
If your event is simple, you can write a short note for each session in the Content tab, where applicable.
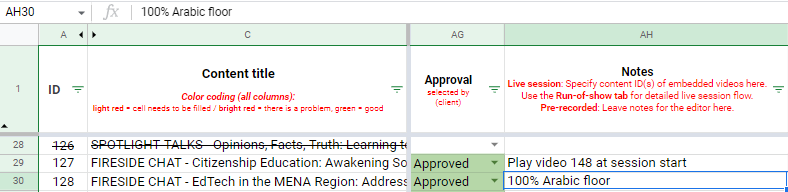
This is only suitable for very simple instructions, for example: “Play video 148 at the beginning”
If you wish to provide more detailed instructions, you can create a Cue Sheet.
Option #2: Using Cue Sheets for detailed instructions
If you need to be able to provide detailed instructions, with a precision down to the second, you can use a Cue Sheet.
Go to the Room Sheet corresponding to your session, and select the Cue Sheet template tab.
Duplicate the template tab for the session you want to provide detailed instructions for.
Note: Make sure to rename the tab to include the Content ID!
Example: Rename your copy to “Cue Sheet – 103”
Select the matching Content ID in the drop down menu, and fill in the instructions.
After you fill the first line of the cue sheet, including the segment’s duration, you will notice that a new line is automatically created, as shown in the example below.
Create one line for each separate segment of your session, assign the correct speaker, select their location, and add information to describe what they will do.
You can also select what should be displayed on each of the screens – DSM, LED Wall, etc.
Note: You can also customize the values of each field in the Cue Sheet settings tab. For example, you could add “Lectern” to the list of Locations, etc.
Once you have updated the list of values for all fields, finish filling the Cue Sheet.
Repeat the process and create a new Cue Sheet for any other session that requires it.
Note: The Cue Sheet tabs are to be used on their own, for the relevant sessions. Due to the level of detail, the information you enter in your Cue Sheet will not be reported in the Rundown tab.
Who do I contact for questions?
For any questions on how to use the spreadsheet, please contact your ProjectSheet.io project manager.
For production-related matters, get in touch with your AV production team.
Note: This contact information would have been provided to you during the project kick-off call.
Stats Tab
This tab is your entry point for all project administration tasks.
It displays a summary of your project’s progress, including useful statistics such as
Number of unmatched speaker bookings
Number of canceled tech checks
Number of no shows
It also includes a summary of the onboarding staff’s notes for canceled / no shows.
Content Tab
The Content tab contains all session-related information.
It will at least contain the list of all your sessions, and it may also include pre-recorded videos, ad-rolls and other content that needs to be cued at some point by our production team. Note: Each content item has a unique ID that cannot be changed once set.
All other elements can be edited, if needed.
If a content item needs to be removed, go to the Content Type column and select canceled off the drop-down menu .
Note: Please never delete rows, as it will cause issues. The various automated features in the project sheet require you use the Canceled status on rows that need to be removed. If you simply delete the row, it will confuse the automation and create unwanted behavior.
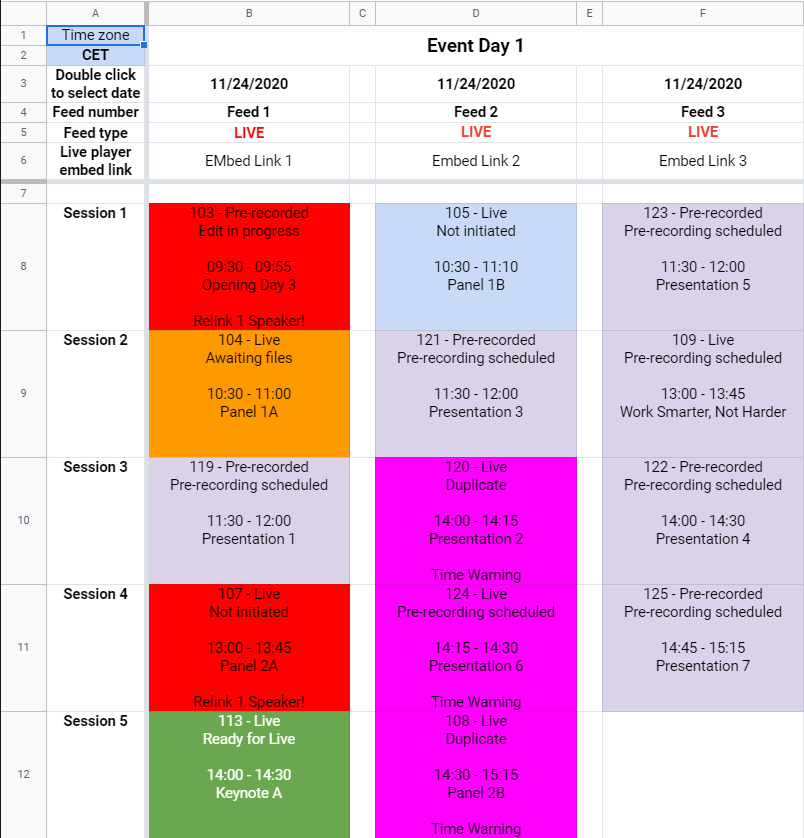
Step 3: Check Schedule for conflicts
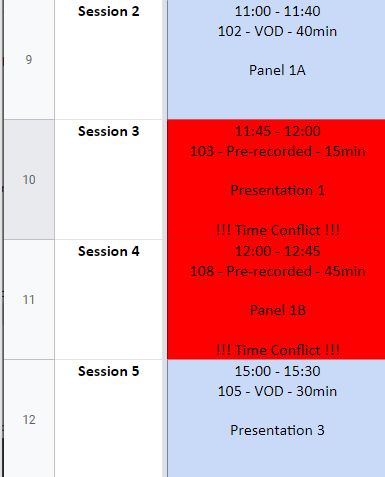
If the schedule shows time conflicts in red (as depicted below), go back to the Content tab to re-adjust conflicting sessions. You can do so by either shortening the duration of the first session or delaying the start time of the second.
Unless your event is fully virtual and pre-recorded, a minimum of 5 minutes between sessions is required.
Both your production team and your audience will need a short break to move between rooms or prepare for the next session.
Our recommendation is to have a minimum of 10 to 15 minutes break between sessions for all events.
Understanding the Room Sheets
Room sheets are the main tool used during the event days.
The data you entered in the Management Sheet and in the Project Sheet is combined together in the Room Sheets.
They are generated automatically and provide you with a synthetic view.
There is one Room Sheet per Location, containing a Rundown tab for each day of the event.
The Rundown tab is where you can see what is being displayed on the stream at any given time. This tab may take a few minutes to refresh, as it is presenting information in real-time.
Each Room Sheet is dedicated to one single location, and contains one Rundown tab per event day for this room.
Your production team uses the Rundown tab as their main source of information during the production of the event.
It provides a synthetic view of all sessions, in chronological order, and includes the list of speakers as well as production notes.
During a session, the time is tracked in 5-min increments. The current time will always be highlighted in red. The time passed will be grayed out (as depicted in the image below).
Cue Sheet Template and other tabs
The Room Sheet includes other useful tabs for the event day
Speaker Inspector (same as the Project Sheet)
Content inspector (same as the Project Sheet)
Cue sheet – used to provide detailed information on sessions that require it.
If you want to provide detailed, minute-by-minute run-of-show instructions for a session, simply duplicate the Cue Sheet Template tab
Then, select the Content ID of your session in the drop down menu
You can then start filling the Cue Sheet and provide detailed Run Of Show instructions. Start by indicating the duration of the first segment, select the speaker that will be active, and select their position. Then, add any other information, and move on to the next segment on the line below!
Note: Pay attention to the format of the segment duration field. When entered correctly, a new line corresponding to the next segment will be created automatically with the correct starting time stamp.
In this example, the session starts at 3:30, and the first segment has a duration of 10 minutes. That’s why the next segment of the session starts at 3:40.
Once you have provided all the information about your session, repeat the process for your other sessions.
Simply duplicate the Cue Sheet template again, and go through all the steps.
Stage Manager View Tab
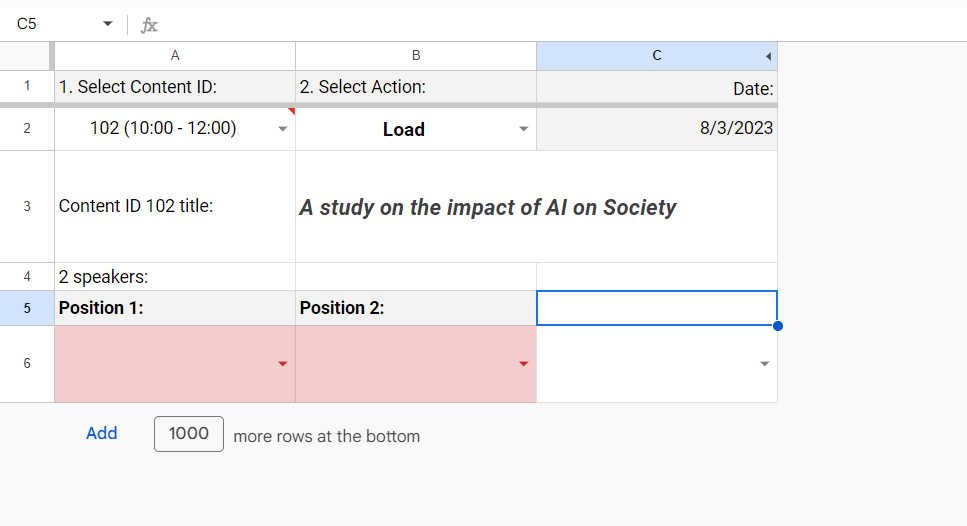
The Stage Manager view lets you select speaker positions.
In short, it lets you select the correct speaker positions on stage during a session, in order to facilitate production.
First, select your session, then select the Load action.
Then, use the drop-down Position menus to select the correct speaker order. The order is what you see when facing the stage, from left to right. Once you are done, select the Save action.
Why is this important? Your production team does not know the face of all your speakers. Doing this lets them display the correct Name / Job title lower thirds for each speakers during production.
Unmatched Recordings Tab
This tab allows you to identify mismatched speaker onboarding or session recording bookings.
For example, a VIP speaker could have been booked by their assistant, or someone might have used an email address different from the one in the Project sheet.
This tab allows you to see these issues and correct them.
Speakers Tab
This is your speaker directory.
It lists all speakers with their personal details, such as their name, contact information, job title, company, and biography.
For remote speakers, this tab will also contain their onboarding results. Our team will report tech check results for each remote presenter, which includes an assessment of their internet connectivity, audio and sound setup, and level of preparation.
If a remote speaker presents a risk, this is where you will be informed of it.
Note: Each speaker has a unique ID that can’t be changed once set
If a speaker is no longer participating, please do not delete them. In their row, go to the Onboarding Type column and select Canceled off the drop-down menu.
Note: Please never delete rows, as deletion does not trigger a cancellation. If you simply delete the row, it will confuse the automation and create unwanted behavior.
Step 4: Add Sponsors (If Applicable)
Step 4.1: Adding sponsors
In the Sponsors tab, insert the names of those sponsoring your event. Remember to upload their logo in the shared project folder, following the naming convention indicated in column G.
Top tip: If in doubt, pay attention to each column’s header – it gives you useful information on how to fill it
Step 4.2: Mapping sponsors to content items
Go back to the Content tab, and fill in the sponsor for each session (if it applies) by selecting them via the dropdown menu.
The Management Sheet is pre-filled with default values, catering to most event needs.
You can add or remove values as you see fit. Note: always leave the “Canceled” option for both Speakers onboarding type and Content type.
Step 2: Complete the Locations tab
The Locations tab is where you define the list of rooms (for on-site and hybrid events) or video tracks (for virtual events).
Note: Remember that you can associate a type to each location. The list of values for the Location type is set in the Settings tab.
The locations you list in these tabs will be available in the Project Sheet after a few minutes.
This will allow you to specify which session happens in which room, or on which video track.
You can also provide additional information such as room capacity, main contact, street address, and so on.
Meeting Links Tab
Once the details of a session (i.e. date, time and duration) are finalized, a “production call” can be created. In other words, your production team creates a Teams link to send to remote speakers before the event.
This meeting link will be used by the speakers to connect to the live session and is stored in the Meeting links tab.
This tab is where your production team will fill in the Meetings links. As a Project Sheet user, you will find your session’s meeting link in the Project Sheet, Content tab, as well as the Rundowns for each session.
Sponsors Tab
Some of your event content may be sponsored. The Sponsors tab lists all the information about your sponsors, including their logos, as well as any other items needed for the event.
Each sponsor has a unique ID that cannot be changed once set.
How to fill the Project Sheet
Here are 4 easy steps on how to fill out your spreadsheet.
Top tip: We recommend you follow these steps in order to ensure that the set-up of your event with us is quick and effortless.
In the Speakers tab, fill out each speaker’s first name, last name and email address.
Top tip: If in doubt, pay attention to each column’s header – it gives you useful information on how to fill it
Onboarding
Next, select their Onboarding Type and Role.
The Onboarding Type refers to the way in which a remote speaker (connecting via a conference call software) will be prepared before an event.
For example, they could be scheduled for a Tech-Check (a 15min technical brief) or 1:1 Onboarding (a 45min call combining a technical check and general briefing).
Role
The Role column is used to specify what this person will do during the event. For example, they could be a Remote speaker, an Onsite speaker, a VIP, an MC, a moderator, and so on.
Remember: If you want to add or remove roles from the list, simply head over to the Management sheet to do that.
Under Managed by, insert the person on your team in charge of that particular speaker by selecting their name from the dropdown menu.
If your staff member’s name is missing, head over to the Management Sheet and add them.
Speaker information
Finally, fill out the fields labeled: Email, Job Title, Company and Phone Number.
Important: Please never swap content between IDs or delete any rows. The order in which speakers are listed in this tab is irrelevant to your event’s schedule, and must remain the same throughout the project. Swapping a person from one Speaker ID to another will create data integrity issues and lead to unwanted behavior.
Step 2: Add Content
Step 2.1: Adding the content
In the Content tab, start adding your sessions and fill out Session title, Content type, Date, Start time, Duration and Location.
Remember, if a location is missing, you can add it in the Management sheet.
Note: Please never delete any rows, or swap data between rows. Each session ID is unique and cannot be changed once set. The sessions do not have to be listed in chronological order in this tab – list them in any order.
Note: If you forgot a session in the middle of the first morning, do not shift everything – add it at the end of the list, with the correct date, start time and duration,
If you need to see your sessions displayed in chronological order, this happens in the Schedule tab. The Content tab cannot be used to see your schedule in order.
Top tip: If in doubt, pay attention to each column’s header – it gives you useful information on how to fill it
Step 2.2: Match speakers with content items
In the Content tab, you will find columns labeled Speaker #1 to #7. Under each you will find a drop down menu with the names of all the speakers. This list is based on the Speakers tab.
Fill out the columns with the names of who will be presenting in the same session.
Repeat this for all your sessions (if applicable).
Note: If you need to modify a speaker’s name, go back to the Speakers tab and change it in First and Last Name columns. You can now return to the Content tab and select the corrected name off the dropdown menu.
Step 3: Check Schedule for conflicts
If the schedule shows time conflicts in red (as depicted below), go back to the Content tab to re-adjust conflicting sessions. You can do so by either shortening the duration of the first session or delaying the start time of the second.
Unless your event is fully virtual and pre-recorded, a minimum of 5 minutes between sessions is required.
Both your production team and your audience will need a short break to move between rooms or prepare for the next session.
Our recommendation is to have a minimum of 10 to 15 minutes break between sessions for all events.
Step 4: Add Sponsors (If Applicable)
Step 4.1: Adding sponsors
In the Sponsors tab, insert the names of those sponsoring your event. Remember to upload their logo in the shared project folder, following the naming convention indicated in column G.
Top tip: If in doubt, pay attention to each column’s header – it gives you useful information on how to fill it
Step 4.2: Mapping sponsors to content items
Go back to the Content tab, and fill in the sponsor for each session (if it applies) by selecting them via the dropdown menu.
Production Calls tab
In this tab, you’ll find all the details your remote speakers will need to join their live sessions.
This includes the links to the video calls for each session, the list of email addresses for this call, and the time at which remote speakers need to connect.
Your production team will let you know when this is ready for you to use. The prerequisite is to have completed both the Content tab and the Speakers tab with final information.
Log tabs
The Management Sheet contains 3 useful logs tabs
Speakers Log
Content Log
Sponsors Log
These tabs provide analytical information about changes made to the Speakers tab, Content tab, and Sponsors tab in the Project Sheet.
You can use this information to find out when something has been modified.
You can also filter the logs to only include what changed in the past X days. This is useful when the log contains a long list of changes.
The data you entered in the Management Sheet and in the Project Sheet is combined together in the Room Sheets. They are generated automatically and provide you with a synthetic view.
There is one Room Sheet per Location, containing a Rundown tab for each day of the event.
The Rundown allows you to follow what is happening in each room with ease, and keeps track of the time.
Top Tip: Your production team will use the Rundown tab in the Room Sheet as a reference during the production. You should use it too!
Each Rundown tab keeps track of the current time, marked with the red set of lines in Columns A, B and C. Thanks to this feature, you can easily identify the next session.
The Rundown gives you easy access to a session’s information at a glance during production.
Who are the speakers (name, contact details including phone number)
Is anyone joining the session remotely
What is the duration of the session
Is there anything specific about this session’s format
To conclude, the Rundown tab is perfect for simple sessions. If your session is more complex, read the next chapter and learn how to build a Cue Sheet for your session.
How to Provide Detailed Run Of Show information
It is common to need to provide additional information about what will happen in any particular session.
With ProjectSheet.io, there are two ways to do this.
Option 1: Short sentence for each session (Notes column in the Content tab)
Option 2: Detailed instructions about your session’s content (to the second) if you use Cue Sheets
The first option will allow for a display of these instructions in the Room Sheet, in the Rundown tab.
The second option involves creating Cue Sheets, and should only be used if you need to provide detailed instructions for a session.
Option #1: Simple instructions in the Content tab (Project Sheet)
If your event is simple, you can write a short note for each session in the Content tab, where applicable.
This is only suitable for very simple instructions, for example: “Play video 148 at the beginning”
If you wish to provide more detailed instructions, you can create a Cue Sheet.
Option #2: Using Cue Sheets for detailed instructions
If you need to be able to provide detailed instructions, with a precision down to the second, you can use a Cue Sheet.
Go to the Room Sheet corresponding to your session, and select the Cue Sheet template tab.
Duplicate the template tab for the session you want to provide detailed instructions for.
Note: Make sure to rename the tab to include the Content ID!
Example: Rename your copy to “Cue Sheet – 103”
Select the matching Content ID in the drop down menu, and fill in the instructions.
After you fill the first line of the cue sheet, including the segment’s duration, you will notice that a new line is automatically created, as shown in the example below.
Create one line for each separate segment of your session, assign the correct speaker, select their location, and add information to describe what they will do.
You can also select what should be displayed on each of the screens – DSM, LED Wall, etc.
Note: You can also customize the values of each field in the Cue Sheet settings tab. For example, you could add “Lectern” to the list of Locations, etc.
Once you have updated the list of values for all fields, finish filling the Cue Sheet.
Repeat the process and create a new Cue Sheet for any other session that requires it.
Note: The Cue Sheet tabs are to be used on their own, for the relevant sessions. Due to the level of detail, the information you enter in your Cue Sheet will not be reported in the Rundown tab.
Speakers Inspector Tab
This tab allows you to look up everything about a specific speaker more easily.
It will show information including a speaker’s contact details, session participation, scheduled tech-check and onboarding calls.
Note: This tab is read-only, it does not allow you to update speaker information (this happens in the Speakers tab)
Stage Manager View Tab
The Stage Manager view lets you select speaker positions.
In short, it lets you select the correct speaker positions on stage during a session, in order to facilitate production.
First, select your session, then select the Load action.
Then, use the drop-down Position menus to select the correct speaker order. The order is what you see when facing the stage, from left to right. Once you are done, select the Save action.
Why is this important? Your production team does not know the face of all your speakers. Doing this lets them display the correct Name / Job title lower thirds for each speakers during production.
Calendly Bookings tab
This tab allows you to see all the bookings we have received for your project.
This advanced feature can help you find out what happened if you need to analyse a problem.
Example: A speaker has not received their invitation. By looking at this tab, you can find out that they have entered their email address incorrectly, with a typo for example.
Content Inspector Tab
This tab shows you a synthetic view of a specific session.
This is most useful when looking up information such as the speaker(s) of a session, or when and where a session is taking place.
In this tab, you can easily make some verifications, such as the level of preparation of each speaker, the presence of the slides deck, and more.
Note: This tab is read-only, it does not allow you to update content information (this happens in the Content tab)
The Project Sheet is made of a number of tabs. Within each of the tabs, is a spreadsheet with various columns.
Here we will explore these columns – the type of data that goes into each, who is responsible for adding the information, how to update the data, what to do once the data is updated, how to re-link mapped cells when necessary, as well as other important things to note.
Progress and Issues / Schedule Tabs
Both tabs are automatically generated and read-only. You cannot modify their content – changes won’t be saved.
On both tabs you can see:
Time zone (top left): Displays the time zone of the event and all its sessions.
Note: For the progress and issues tab, we have an arbitrary 5-min break between live sessions that is suggested.
This is to allow the production team to prepare for the next one and the attendees to move to the next room.
Note: In the reality of an event, especially for breakouts, back to back sessions cannot physically happen. They will start late.
If the time gap is less than 5-mins between the two sessions, it will be flagged in purple. It is up to you to take action on your schedule or not.
The schedule provides the following details:
Start and End time
Content ID
Content Type (i.e. Live, Pre-recorded, VOD, etc.)
Content Duration
Content Title
Time Warning (in case of back-to-back live sessions)
Collision Warning (conflict with other sessions)
Warning (indicates a speaker is unlinked from the Content tab)
Content Tab
Content ID: Every session is assigned a unique ID and can only be listed once. An ID cannot be reassigned if the session gets cancelled. If this happens, set the session’s Content Type to Cancelled.
Content Title: Make sure the session title is capitalized and spelled correctly, as it will be displayed as is on the UpNext screen.
Content Type: Select an option via its dropdown menu.
To be decided: No choice has been made as to whether the content will be live or pre-recorded.
On-site Livestream: Content takes place at a venue and is live streamed to a remote audience.
Remote Livestream. Content takes place virtually and is live streamed to a remote audience.
Pre-recorded: Recorded ahead of time, but broadcasted to look as if it is live (i.e. simu-live or as part of content to playback during another session – used Embed location if that is the case).
Not EPEAK: Refers to any external content being used.
Round table: Content is a breakout room (on site or remote) taking place in a room, usually no camera, no recording.
Hybrid: A content that is live streamed from a venue but involves both on-site and remote speakers.
Translation: A session being translated into other languages.
On-site recording: For recordings of content during the event, for example, a VIP interview.
Duplicate: This is when there was a mistake and a content has been added twice. Label as Duplicate the ones you’d like to remove.
Canceled: Anything that has been canceled. Items should always be canceled, as opposed to deleted.
Date: Session date. Double-click in order to set.
Start time: The session’s starting time in 24-hour format (i.e. 17:30). No other format can be used.
Duration: Type in the content length, in minutes. For example, if your session is 1h30, type in “90”.
Location: Select which Room / Video feed the session will be played on (i.e. Feed 1,2,3)
Note: VOD is used for Video-On-Demand at any point in time. It should be used for content that will be made available to watch anytime by the attendees, as opposed to being live streamed into a video track at a set date and time.
Sponsor: Select via the dropdown menu. The menu will display the information you added into the Sponsors Tab.
Content status: This is automated.
Review link: This link is for your internal use only, so that you can approve a pre-recording or request updates. It should not be shared with the speakers.
Approval: This is where you can approve a video edit or request updates. Select whichever applies from the drop-down menu.
Approved
Needs adjustments – if a change needs to be made on this content, please type the specifics into the Notes column.
Rejected – if you do not approve of the content the speaker has submitted.
Content language: Only needs to be filled out if the session will be interpreted into different languages.
Speaker 1-7: Select the speakers for each session using the drop-down menu. Remember, the list of available speakers is pulled from the Speakers tab.
Note: If you need to adjust a speaker’s name go back to the Speakers tab and edit the First Name or Last Name column by double-clicking on it. Then, go back to the Content tab and re-select the revised name from the drop-down menu. The edit you made in the Speakers tab will not automatically show up in the Content tab.
If the speaker you selected is displayed in red, it means that there is a typo in their name – make sure to double check the spelling against what is entered in the Speakers tab.
Speaker Emails: For each session, we generate a list of email addresses belonging to the participating speakers. This allows you to copy & paste their contact simultaneously and quickly get a message out to everyone.
Speakers
Speaker ID: Every speaker is assigned their own ID and can only be listed once. If a speaker drops out, their ID cannot be reassigned to someone else.
If a speaker’s name is blue, they have yet to be linked to a session (do this in the Content tab).
If a speaker is no longer participating, set their Onboarding Type to cancelled.
First & Last Name: Please ensure the name is spelled and capitalized correctly in each of the columns.
Full name: It is automatically generated from First name and Last Name columns. You can copy the name from this column to paste it somewhere, but please do not edit it here. To edit a name, please do so in the First name and Last Name columns.
Onboarding Type: Fill out this column by using its dropdown menu.
Individual 1-by-1 – speakers that will be onboarded individually.
E-learning + Tech-check – speakers that will be enrolled in E-Learning and have a short, 15-min tech check
To be decided
Individual – Speakers that will benefit from a longer, 45-min in-depth onboarding
No Onboarding – speakers that do not require onboarding, for example onsite speakers.
Note: If a speaker is pre-recording their session, their tech-check will be performed at the start of the recording appointment.
Onboarding Status: This is an automated column that informs you of the status of the onboarding.
Notes: This field is used either by you, to provide specific information about a particular speaker, or by the onboarding team, to provide specific feedback about a speaker.
Type: For each participant, use the dropdown menu to select the type of speaker they are. Anyone selected as a Moderator, will be given additional guidance from our team during the onboarding session.
Timezone: Time zone (provided by speaker) is populated with data from the speaker booking. If incorrect, the override checkbox needs to be ticked and the correct time zone needs to be selected in the next column. It serves as context information in case they need to call the speaker.
Note: The production team will only contact speakers if they are late logging in for their live session.
Phone number: Filled automatically from the booking, if provided by the speaker. Tick the override checkbox and fill the adjacent column if there are adjustments to the provided info.
Job title & Company: Automatically filled from the booking.These can be edited by simply clicking on the cell and typing in the correction. Please ensure no spelling mistakes are made and that the capitalization of names is uniform, because this is how it will be displayed on the live
If a cell in either column is highlighted in red, the information is too long and needs to be shortened.
During a live broadcast, titles that are too long will not be cropped, but automatically shrink to fit. So, if the title is kept lengthy, the text will be small and harder to read.
Slides: If you know the speaker will be using slides, select yes off the drop-down menu. During the speaker’s onboarding or tech-check we will ensure they are familiar and comfortable with the process of how to maneuver their slides when presenting live or remotely (whichever is applicable)
Camera Check, Sound Check, Position Check: These fields will be filled out by a member of the technical team during onboarding or tech-checks. There will be three ratings given (PASS, Not great and FAIL) to denote the quality of each speaker’s remote set-up (if applicable)
Managed by (AV Provider): Here you will find the name of the AV Team representative in charge of that speaker’s tech check.
Managed by (Client): Here you can use the drop-down menu to select which of your staff members is in charge of that speaker. This information is good to have in case a presenter has a question that the AV provider team can’t answer. If no name is entered here, the main organizer’s contact will be given to the speaker.
SessionsThese columns are filled out automatically through the Content tab. They cannot be edited. Each speaker will have these columns filled out with the date, time and name of their session(s). You can tick the checkbox to display the session information in the speaker’s local time.
Cancelled speakers
If a speaker drops out before the start of the event or their session gets cancelled, do not remove their row. Instead, set the speaker’s Onboarding Type to cancelled. Doing this will automatically strike through their row.
Sponsors
In the corresponding cells, insert the name of your sponsor and add any notes. Upload the branded material in the Sponsors folder. The Project Sheet will identify uploaded materials based on the file name matched with the sponsor name.
Manual Bookings tab
This tab is an advanced feature. It lets you match a meeting that was booked outside of the booking system with the relevant speaker or session.
Example: You have a session recording that you need to book manually for any reason. You managed to schedule the meeting, but the Project Sheet still tells you that this recording is not scheduled because it was done outside our system. In this tab, you can declare the manual booking and associate it to the correct session, resulting in more accurate project statistics.
There are a couple rules to follow to ensure that your Project Sheet works well. Here are a few examples of what can go wrong, and how to fix it.
An automated field has been filled manually
A lot of fields are automated in the Project Sheet. This is indicated by the column header, as shown in the screenshot below.
If an automated field is accidentally filled manually, the Project Sheet will start malfunctioning.
In the example below, someone filled cell E12 with some data, although column E is automated. As a result, the Project Sheet does not display data correctly anymore
In order to fix it, delete the content of Cell E12. After a few minutes, the Project Sheet will function normally again, as shown in the screenshot below.
Note: The same principle applies to all automated fields. If you notice a Project Sheet malfunction, check all automated fields and make sure nothing has been filled in manually by mistake.
I accidentally deleted a line
It is common to want to delete a line if its information is not needed anymore. However, this is not the correct method to use in the Project Sheet. Instead, the line’s status must be set to Cancelled, as shown below
So what happens if a line is deleted by mistake? In this example, Content ID 105 has been completely deleted.
In order to fix this, we will re-create a line with Content ID 105 at the bottom of the list, fill it with placeholder data, then cancel it.
This will allow the Project Sheet to update everything correctly in the backend, preventing any further issues.